How to Use AI to Automatically Rename Screenshots on Your Mac
With a simple Apple Shortcut and a bit of AI, you can rename your screenshots based on what they contain, not just when they were taken. That makes it much easier to find what you are looking for and keep your digital life organized. Let’s dig in.

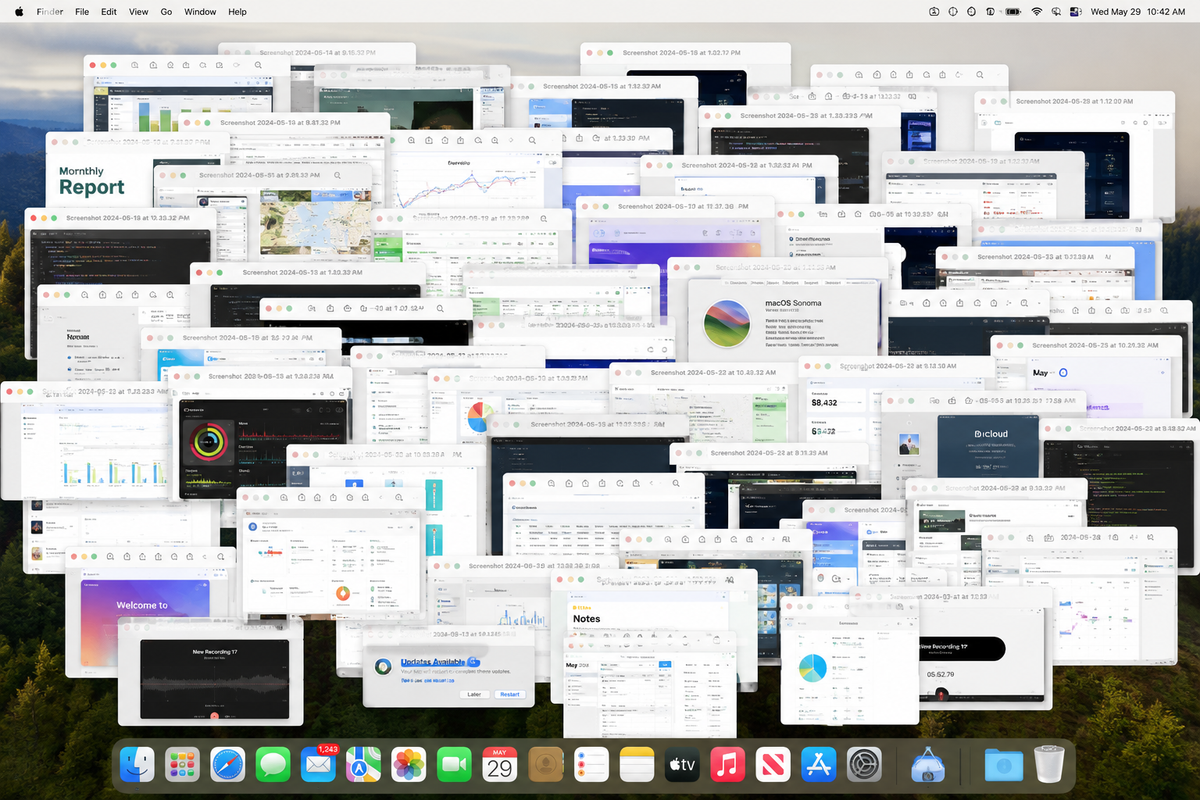
Screenshots are useful until you need to find one again.
By default, macOS saves every screenshot with a filename based on the date and time:
Screenshot 2026-06-02 at 11.38.42 AM
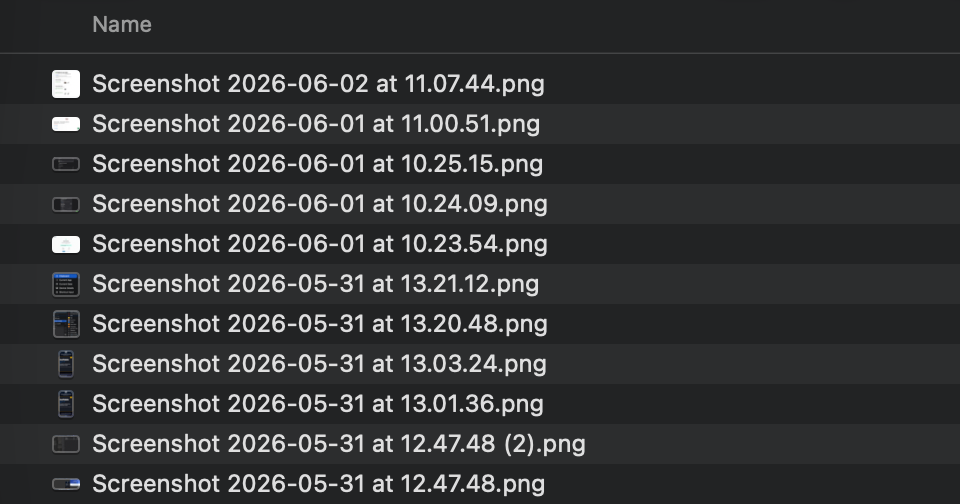
That tells you when the image was created. It tells you almost nothing about what is inside it.
With a simple Mac Shortcut, you can use AI to analyze a screenshot and rename the file based on its contents. A screenshot of your ChatGPT settings might become:
chatgpt_settings
A screenshot of a website design might become:
website_layout_reference
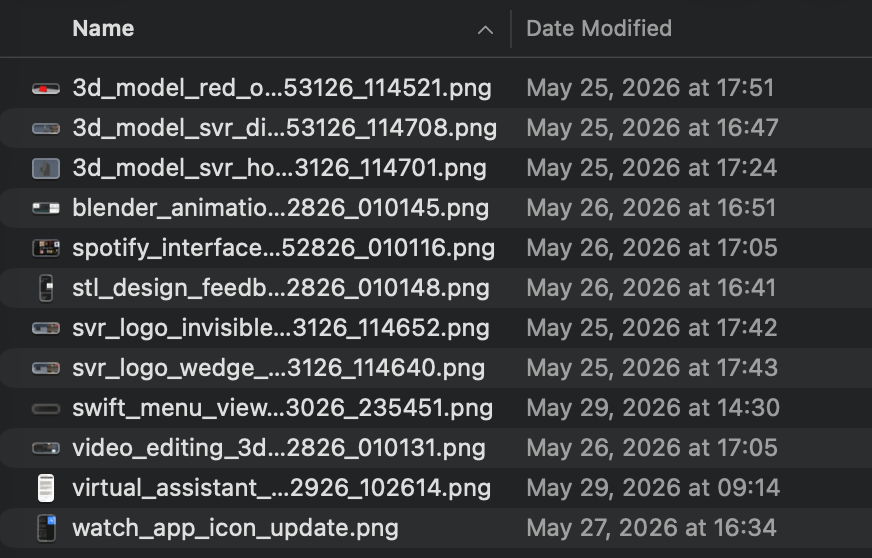
The Shortcut only runs when you choose to use it, so you remain in control of which images are shared with the AI model.
Here is how to set it up.
What You Are Building
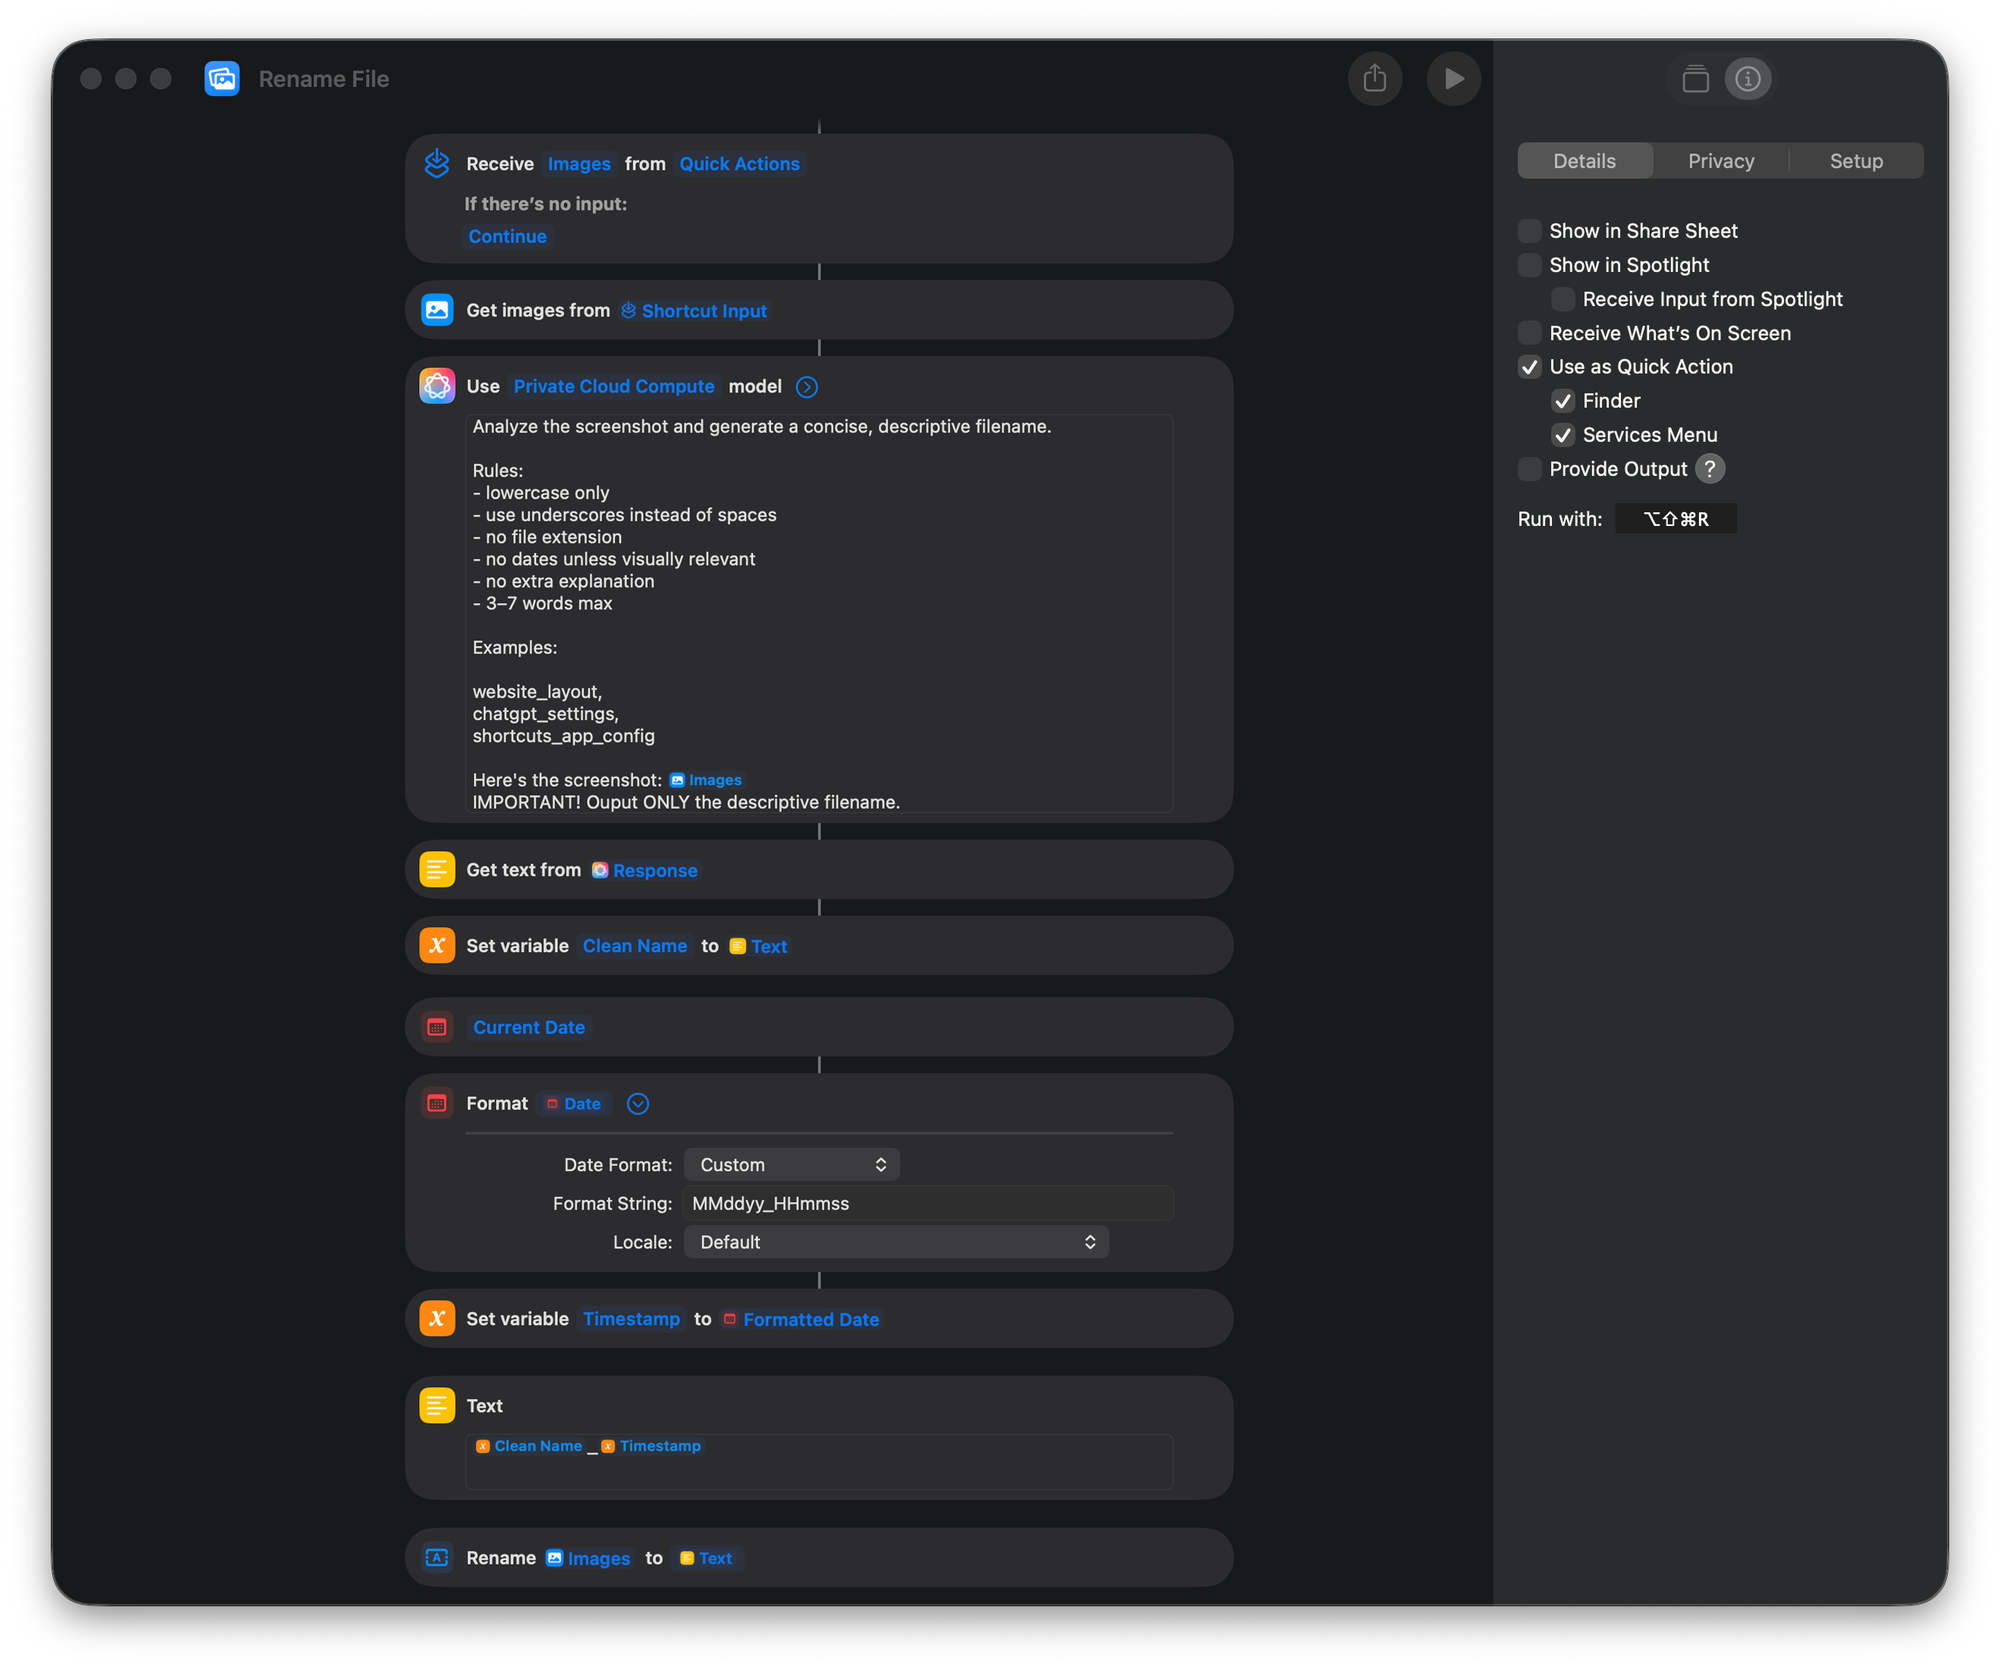
The finished Shortcut will:
- Receive a screenshot that you select in Finder.
- Send the image to an AI model with a specific prompt.
- Generate a short, descriptive filename.
- Rename the original screenshot.
- Run from Finder or with a keyboard shortcut.
Watch the Tutorial
Your final Shortcut will look like this
Step-by-Step Tutorial
Step 1: Create a New Shortcut
Open the Shortcuts app on your Mac.
Click the + button to create a new Shortcut.
Give it a clear name, such as: Rename Screenshot with AI
Step 2: Configure the Shortcut as a Quick Action
Open the Shortcut’s information panel by clicking the information 'i' icon in the top-right corner.
Select Use as Quick Item to enable access from Finder.
Step 3: Point it to Your Screenshot Image
From the Actions Pane, search for Get images from input and double click to add.
Set the Shortcut to get images from Shortcut Input.
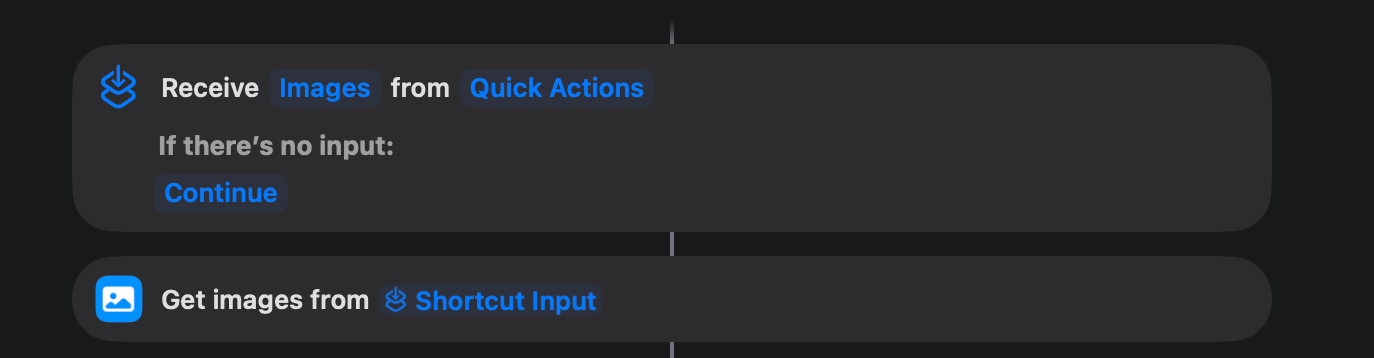
Change Receive to be Images from Quick Actions.
Step 4: Add the AI Action and the Prompt
Search the available actions for Use Model.
Double click to add the action to your Shortcut.
Set the input to the image received by the Shortcut. Then paste the following prompt:
Prompt
Analyze the screenshot and generate a concise, descriptive filename.

Rules:

- lowercase only

- use underscores instead of spaces

- no file extension

- no dates unless visually relevant

- no extra explanation

- 3–7 words max

Examples:

website_layout

chatgpt_settings

shortcuts_app_config

Here's the screenshot:***[IMAGES VARIABLE HERE]***

IMPORTANT! Output ONLY the descriptive filename.
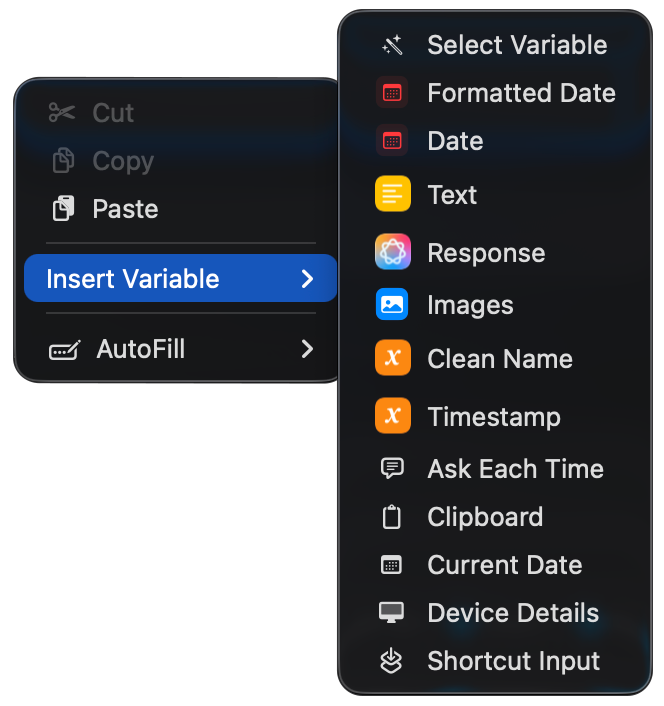
Make sure the selected image is passed to the AI model along with the prompt by replacing the [IMAGES VARIABLE HERE] in the prompt with the image variable as shown below. (Right click, Insert Variables, and select 'Images' to add)
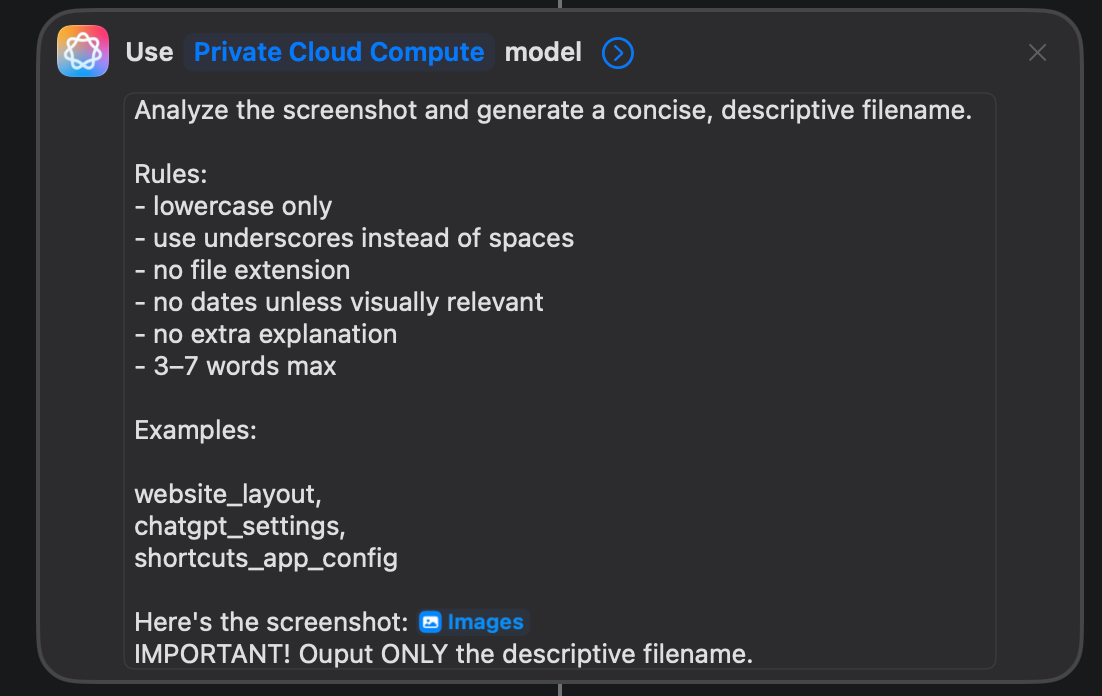
These constraints matter. Without them, the AI may return filenames that are too long, inconsistently formatted, or accompanied by unnecessary explanation.
Step 5: Set Variables and Define Naming Convention
Add in a Get Text from Input, setting the input to 'Response.'
Add a Set Variable action. Type in Clean Name and set it to Text variable.
Next add in a Date action set to Current Date and add in a Format Date action.
From the Format Date settings, change Date Format to Custom and replace the Format String with:
MMddyy_HHmmss
This will change January 1, 2026 at exactly 12:05pm to be '010126_120500'.
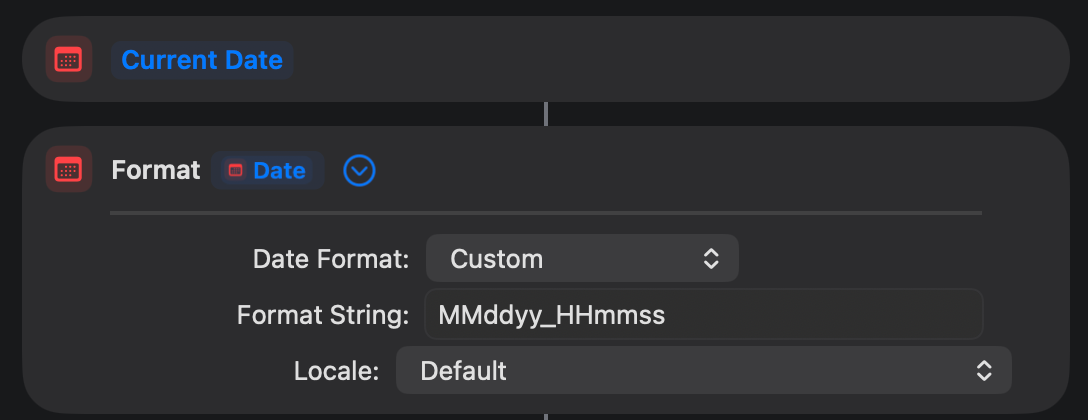
Add in another Set Variable. Name it 'Timestamp' and set the variable to Formatted Date.
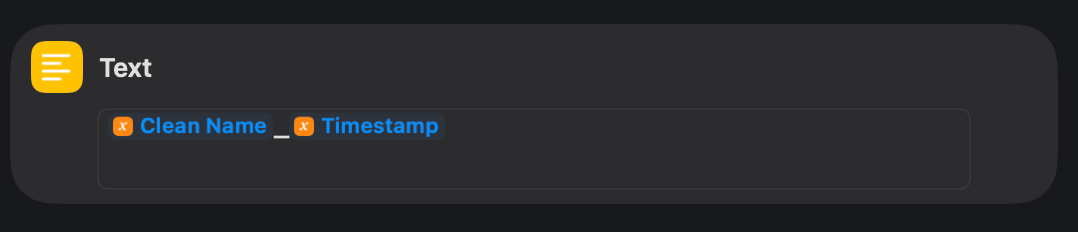
Finally add in a Text action, and right click in the field, select Insert Variable and add in Clean Name then type in an underscore and then right click in field, select Insert Variable and add in Timestamp.
This defines your naming convention using the variables we've set, above.
Step 6: Rename the File
You need one final action to apply our generated name to the original screenshot.
Search for and add Rename File. Be careful to select the action that renames the file, not an action that changes text.
Inside the Rename File action:
- Right-click the first variable field.
- Choose Images
- Right-click the second variable.
- Select Text
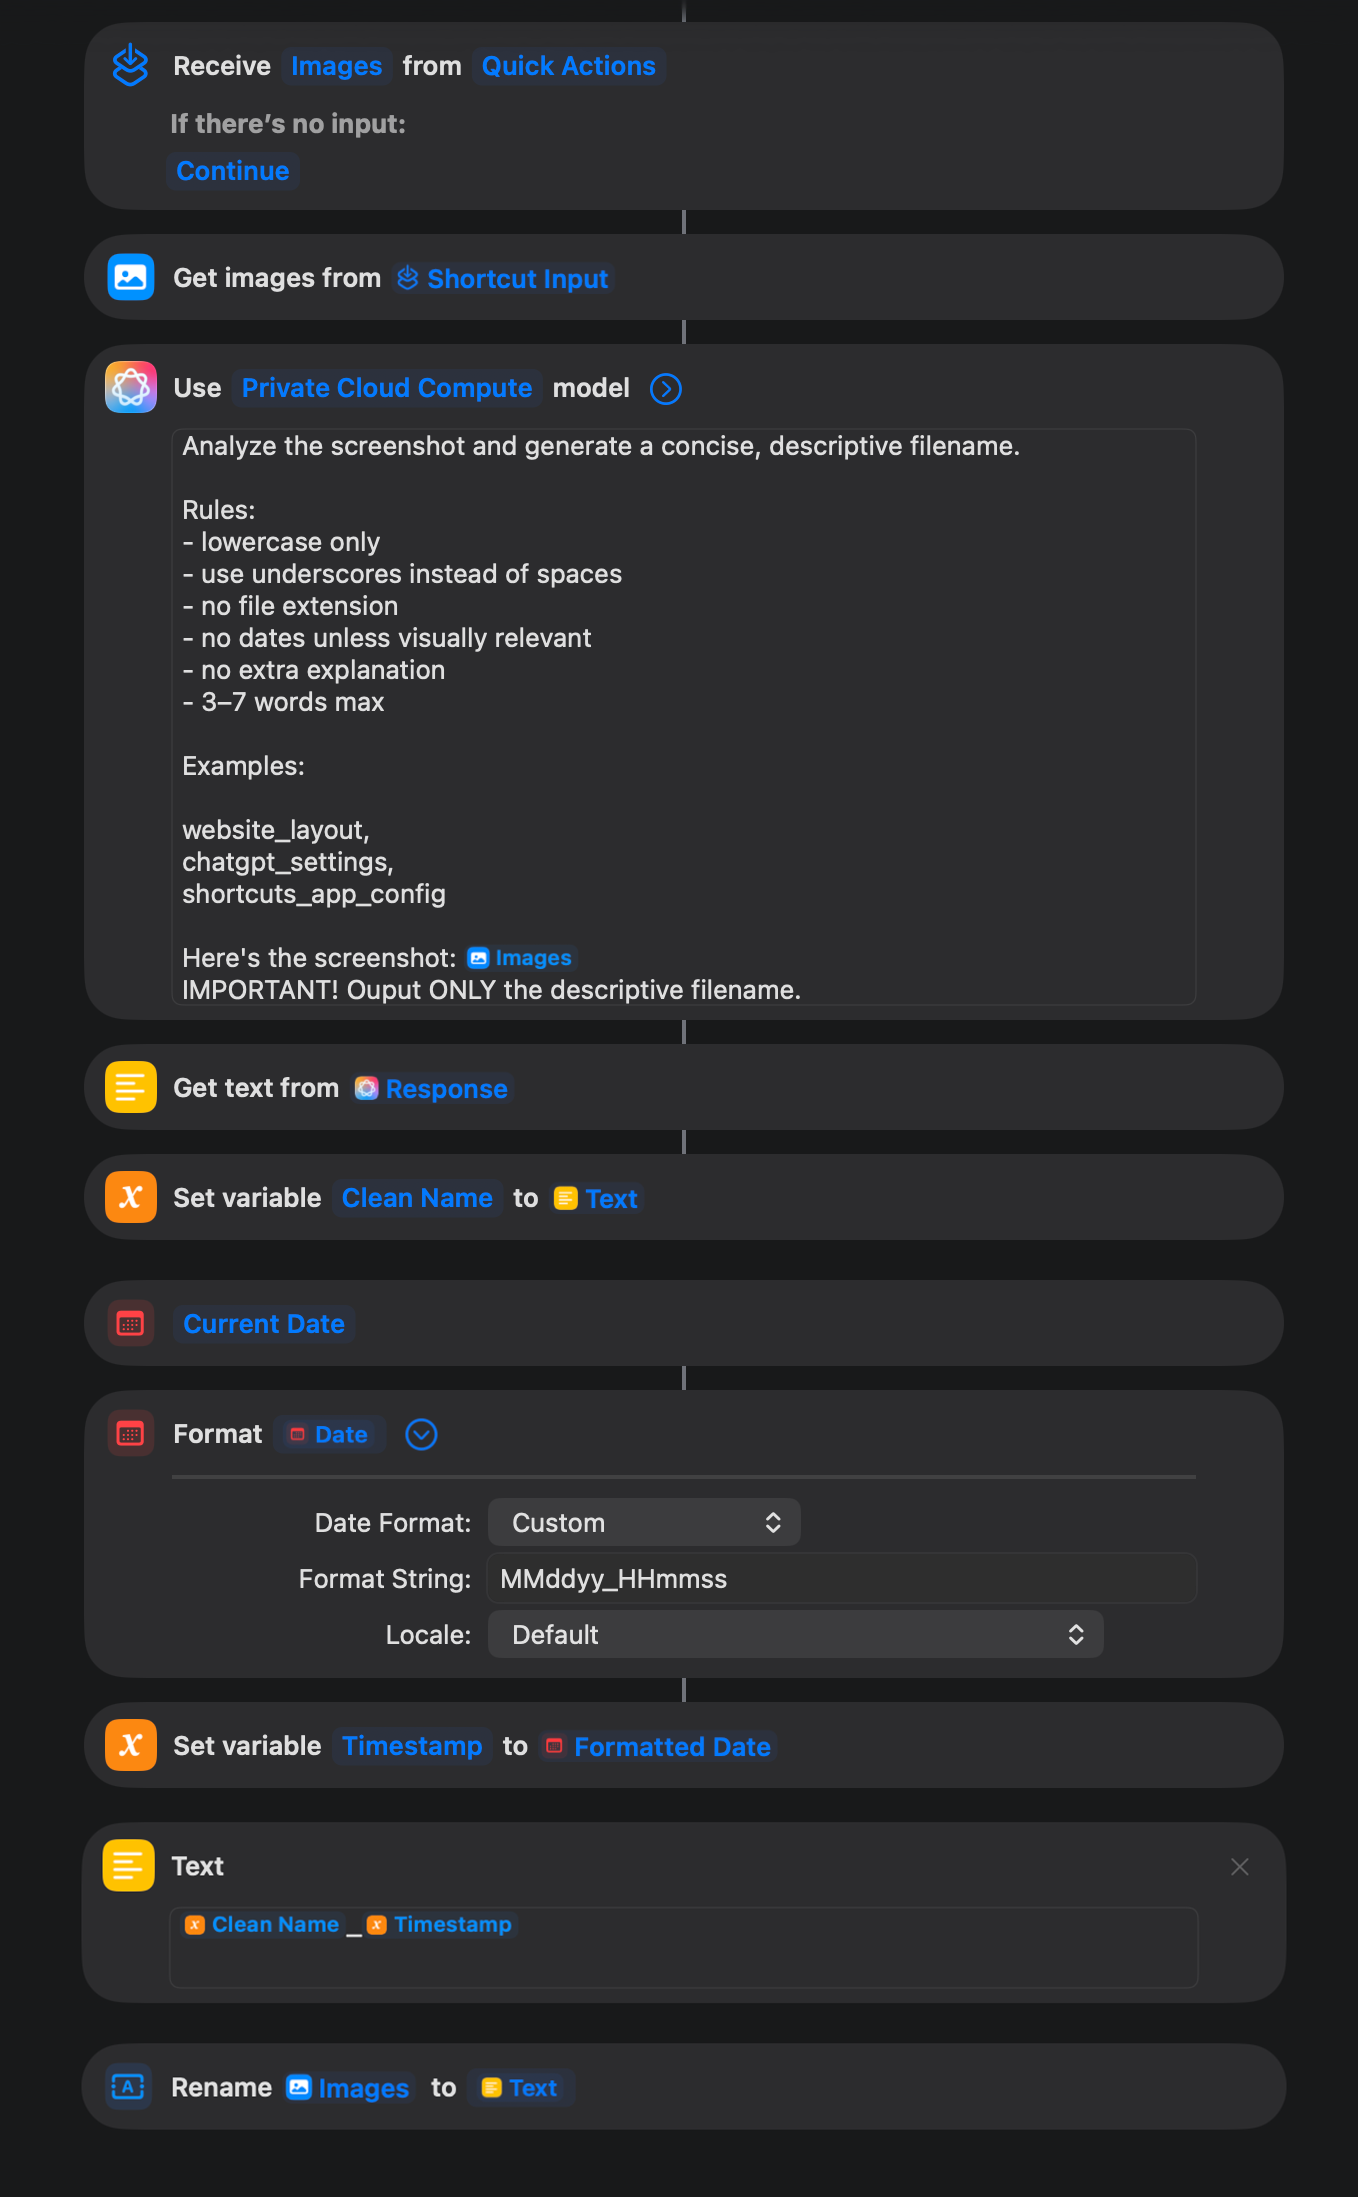
Your Shortcut will now take the original screenshot, analyze it, and rename the file using the AI-generated description.
The final shortcut actions flow will look like this:
Step 7: Add a Keyboard Shortcut
You can run the Shortcut by right-clicking a screenshot and selecting it from the Quick Actions menu.
For faster access, add a keyboard shortcut.
Open the Shortcut’s information panel again by selecting the 'i' button and select:
Add Keyboard Shortcut.
In the Run With field, type in the following suggested keyboard shortcut:
Command ⌘ + Option ⌥ + Shift + R
This combination is unlikely to conflict with an existing macOS shortcut.
Step 8: Test the Shortcut
Find a screenshot on your Mac that does not contain any sensitive information.
Select the file and press:
Command ⌘ + Option ⌥ + Shift + R
You can also right-click the screenshot, open Quick Actions, and select your Shortcut.
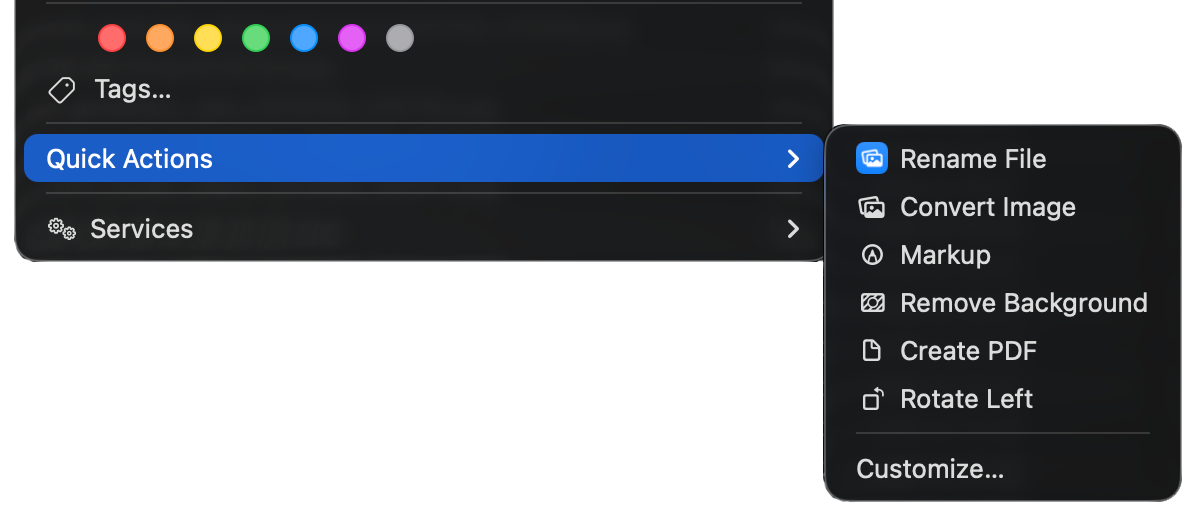
The Shortcut will analyze the image and rename the file automatically.
A screenshot named:
Screenshot 2026-06-02 at 11.38.42 AM
might become:
shortcuts_app_config_060226_113842
That is it.
A Note on Privacy
You may be tempted to automate the process so that every new screenshot is sent to AI and renamed immediately.
I chose not to do that.
Screenshots can contain financial statements, bills, private conversations, internal work documents, or personal information. A manual Shortcut adds a useful checkpoint: the AI model only sees the images you explicitly choose to process.
When it comes to AI, preserving control with a Human in the Loop (HITL) always matters.
Why This Is Useful
This is a small workflow, but it illustrates where AI can become genuinely practical. It takes an otherwise frustrating and manual workflow and adds in the right level of just-enough-AI to create meaningful results.
The goal, as always, is not to add AI everywhere.
The goal is to remove small points of friction from the tools you already use.
Thanks and Subscribe for More
Thanks for reading. Hopefully you find this tutorial useful. For more helpful how-tos, thoughts, and strategy on the ever-evolving space of AI, subscribe to our newsletter.